Using Slack to automate manual approvals in Google Cloud Build
Recently, one of our potential and indispensable customers wanted to have Manual Approval in Cloud Build which allows them to see how infrastructure would look in production. They wanted to see the terraform plan before terraform runs apply the command to avoid misconfigured infrastructure or pipeline getting crashed and causing other infrastructures to abruption.
We tried using a workaround to add and automate manual approval in Cloud Build, basically attempting to pause the running pipeline, allow the reviewers to evaluate it, and if all looks as expected, then the apply step resumes. However, it turns out that this is not possible with Cloud Build. We tried a number of ways to achieve it using different Google Cloud Platform (GCP) and third-party tools but nothing worked.
In the end, we decided to manage two pipelines and put manual approvals on the second dependent pipeline via a slack slash command.
This solution applies not only to Terraform, but is also useful for promoting applications to the production environment from the staging environment, and so on. In this article, we’ll be looking at the Terraform use case.
In this blog, I’m going with terraform use case.
Note: There are a lot of mature CICD tools in the market which provides a lot more capabilities than Cloud Build. A lot of useful features are still missing in Google Cloud Build. My personal favorite and go-to CICD tool is GitLab which actually provides a lot more than any other CICD tool even in free tier. Achieving manual approval in a single pipeline is super easy in GitLab. I suggest my readers to explore GitLab.
Workflow Explanation
Based on our decision to achieve it by managing two Cloud Build triggers and slash command we designed the workflow presented in the below diagram:

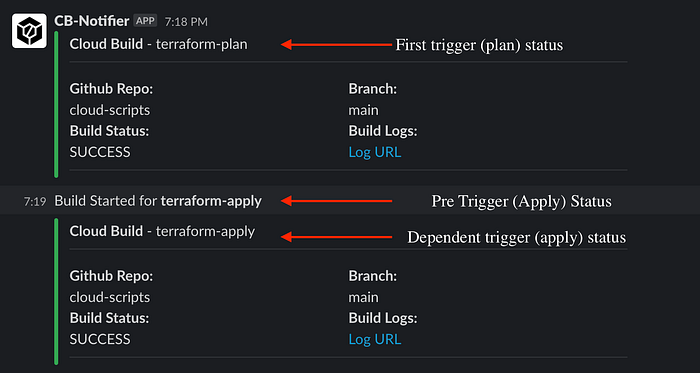
In this workflow, the engineer pushes the code to GitHub which triggers the Terraform plan, runs the necessary commands, generates plan output, pushes the plan output to JFrog Artifactory, and sends a message to a Slack channel along with a log URL where reviewers can see what the plans look like. If everything looks correct, the reviewer supplies a Slash Command to trigger the dependent pipeline. This pipeline then downloads the plan output file from JFrog, provisions infrastructure using the output file, and deletes the file from JFrog.
Code GitHub Link:https://github.com/r4rohan/cloud-scripts/tree/main/scripts/manual-approvals-cloudbuild
JFrog Artifactory
JFrog Artifactory is an artifact storage and management offering by JFrog. It allows us to store, manage and automate the deployment of artifacts, binaries, packages, files etc to servers or clusters across different environments; comes with full CLI and REST APIs customizable to your ecosystem.
We are using the JFrog artifactory to store our plan output further used by terraform apply command by downloading it from JFrog. Setup a new JFrog account (JFrog gives you a free tier instance) and create a new repository from Quick Setup by choosing “Generic” as Configured Package Type.

We also need API Key for authentication; from the User Profile(extreme top right) ➜ Edit Profile ➜ Enter your password and Unlock ➜ Generate API Token. Save it securely somewhere we need it in Cloud Build.
We’ll be storing our terraform plan output in this repository.
Setup Slack Channel
The second step of this automation solution would be to create Slack Channel (if you have any) and create Slack App. Once the app is created from Incoming Webhooks ➜ Add New Webhook to Workspace ➜ Select Channel. Copy webhook as we will need it in upcoming steps.
Setup Cloud Build Triggers
Now that we’re done with setting up JFrog, it’s time to set up the Cloud Build triggers. Cloud Build is a serverless CI/CD service offered by Google Cloud that performs deep security scans of your CI/CD pipeline. With Cloud Build, you can deploy software quickly across multiple environments and all programming languages.
Once we are done with setting up JFrog, it’s time to set up Cloud Build triggers. As decided we have to set up 2 triggers, herein, one for terraform plan and another for terraform apply. From Cloud Build ➜ Triggers; connect your GitHub repo if it is not connected and create triggers.
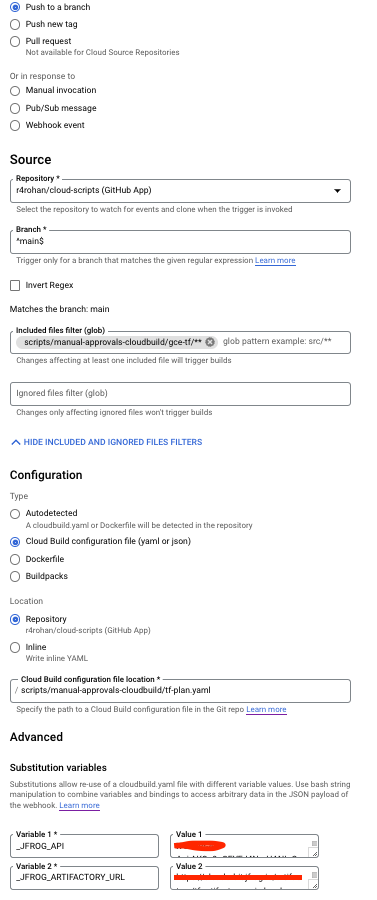
For the terraform-plan trigger choose “Push to a branch” in Event, and provide a path where your terraform code is with /** in Included files filter (glob), plan config file path with the filename in the Cloud Build Configuration file location. Add two Substitution Variables _JFROG_API and _JFROG_ARTIFACTORY_URL with JFrog API key and full JFrog Artifactory Repository URL (https://xyz.frog.io/artifactory/repo_name) respectively.
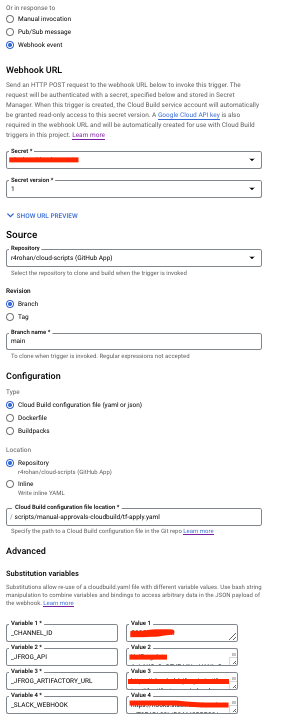
For the terraform-apply trigger choose “Webhook Event” in Event. Once you select Webhook Event, it asks you for a Secret, you can a create new one or go with Use Existing option, I went with the former and Cloud Build Webhook URL will be shown. Do similar for Included files and Cloud Build Configuration file location (apply file) and add the same two substitution variables with the addition of two new variables: _CHANNEL_ID and _SLACK_WEBHOOK.
Not so deep Code Explanation!!!
The first trigger is “tf-plan.yaml”, it would initialize terraform in the directory specified for the dir field, then will check the formatting and if the code is properly formatted it will move ahead with planning else would get crash (this is just to promote clean and formatting coding practice). Terraform would generate a plan output and then Cloud Build will upload this plan output to JFrog.
The second trigger which is “tf-apply.yaml”, would first send a pre-trigger status message to the slack channel, then download the plan output file from JFrog locally that would be utilised by apply step after initializing and once apply step is successful it would delete the output file from JFrog. Everything would run in the directory specified in the dir field.
Create Slack Slash Command
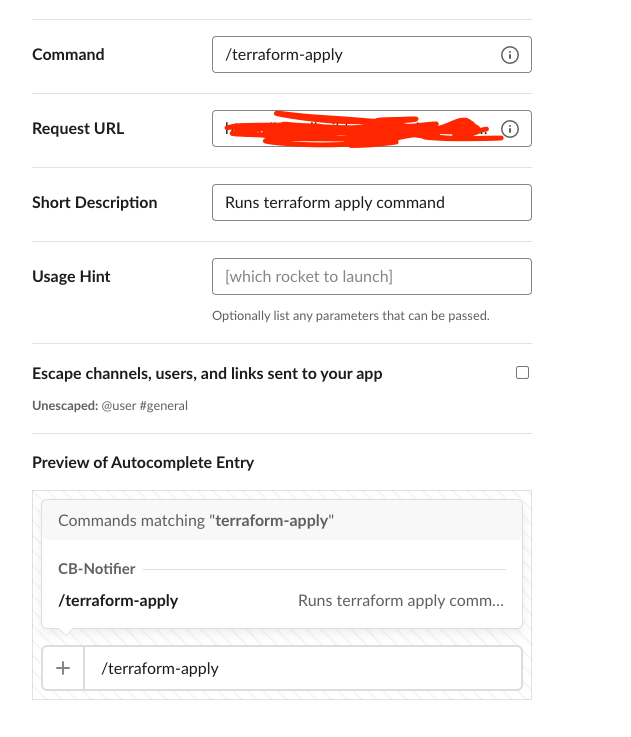
Slash commands allow us to invoke or trigger an app or API with a string from slack. It sends a payload of data from slack to your app or API and the receiver performs or responds in whatever way it is intended or designed for. Optionally you can send parameters with your slash command.
Once you get the webhook for the “terraform-apply” trigger, we need to use it as a Request URL for Slack Slack Command. From your slack app ➜ Slash Commands ➜ Create New Command ➜ Enter Apply Webhook URL.
Pub/Sub Topic
Pub/Sub is an asynchronous messaging service that decouples services that produce events from services that process events; with latencies on the order of 100 milliseconds. It enables us to create publishers (produce events) and subscribers (consume events produced by publishers). You can use Pub/Sub for streaming analytics and data integration pipelines to ingest and distribute data.
Create Pub/Sub Topic

Cloud Builds is a Pub/Sub topic which sends receive detailed Cloud Build status in JSON form. Cloud Build publishes all messages(trigger state, args, transitions, builder image, step status etc) to this topic and it’s managed by GCP.
Cloud-builds topic will be used by Cloud Functions to send Cloud Build trigger status to Slack Channel.
Setup Cloud Functions
Cloud Functions is an event-driven serverless computing service for simple single-purpose functions that are attached to events. In Cloud Functions, you simply upload your code written in JS or Python or Go, and then GCP will automatically deploy the appropriate computing capacity to run that code. It offers dozen of trigger type available which triggers Cloud Functions like HTTP, PubSub, Cloud Storage etc; and with 2nd gen Cloud Functions, GCP has introduced Eventarc Trigger(will write a proper blog on Eventarc Trigger later) with tons of Event providers including Cloud Audit logs.
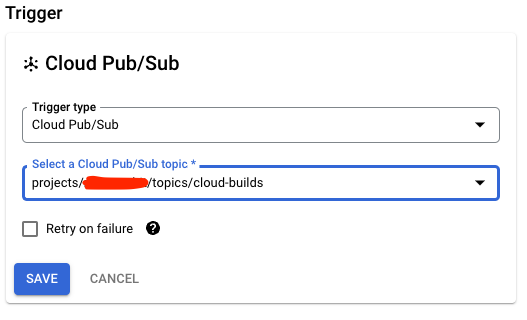
Herein, we need to create one Cloud Function with Pub/Sub as the trigger type and choose the cloud-builds topic from the dropdown.
In the next step, you have to put Nodejs code(entry point subscribeSlack) which gets triggered whenever the cloud build publishes a message to the cloud-builds topic and sends it to Slack Channel.
Once the cloud function gets created you will see one subscription with Push delivery type automatically being created and attach to the cloud-builds topic. This subscription is subscribed to the cloud-builds topic and receive all message in JSON and then pass it to cloud functions.
One more not-so-deep Code Explanation!!!
Every time Cloud Build runs it sends all information to the cloud-builds Pub/Sub topic. Whenever a message is published to a topic and consumed by a subscription, the cloud function will get triggered and first, the message will be parsed, then will get filtered with a status that we have passed in the code for const status, so statuses like QUEUED, WAITING, RUNNING etc would be ignored, then slack message would get constructed and the message would be posted on Slack Channel.
There is always a better solution for any problem but this is a solution from my side that I feel is more suitable for the use cases we had. Feel free to highlight this para and share other solutions or links to other solution blogs.
Anddddddd, that’s how we do it.
Read my other Cloud/DevOps/Infra blogs:-
Clap if you find this solution informative and useful.


